Arcade Artwork
Reproduction of Circus Charlie Sideart
I have seen two posts in three days about having some reproduction art done for this game. I know very little about it, but thought maybe I should capitalize on that and work on making some vector tracings.
There are very few collectors listed on VAPS with this game, but I emailed the few that listed as having a dedicated upright cabinet.
I have heard back from two of the three I have emailed, hopefully I can get some good photos.
Talking to another reproduction artist in email today, it sounds like he scans in sideart when possible in a ton of pieces and then puts it back together. I hadn’t thought of that, putting the game flat and going to town. That is a ton of work, although it probably gets you the most accurate without distortion. He said that he will mail his scanner to people though. What a process. What if they don’t have the software? You have to have a really willing soul to help you out with that, and a deep bank account.
Most of Pengo Sideart Traced
I had emailed a contact about getting some vector Pengo art that I thought they had. It appeared to me as if they had traced the cardboard bezel at one time, and I thought it would be a good place to start to get some vector versions of the ice mountains, sno bees and the Pengo character himself.
But come to find out, the image of Pengo bezel I saw was just a nice raster scan. So, knowing that I already had some different pieces of the sideart traced from other individuals (Pengo character, Pengo Lettering, Sega Lettering), and seeing that the artwork was fairly simple, I decided to see if I could crank through tracing it in one night.
I got through all of the major sideart details except for the sno bees on the right side of the artwork.
In one more night of work I should have the sideart decal artwork traced good enough to post an image here. Now, there will be some other details to iron out. The Pengo character doesn’t fit up with my photo (which could be due to distortion because I know the tracing is very good), there is a half tone pattern to make the gradient in the letter and the mountains in the original artwork that I will need to address, and of course the color matching.
But at least I will have the Pengo vector artwork to add to my collection. If I want to get into those details later on I can, if I find that there are people out there who want a set of the Pengo artwork I can do some reproductions. I would think there would be a significant demand, I don’t think there is any NOS Pengo sideart out there. I have found 2-3 people who have expressed some interest, Tim Hill, James Hagen and a couple of other arcade collectors in online board posts looking for sideart and control panel overlays. But we shall see.

No NOS Pengo sideart exists
This week I saw someone post about wanting some NOS Sega Pengo sideart, so I got motivated to do some vectorization of the sideart of one of my favorite games.
Last night I got through 80% of the Pengo sideart. I had taken the photos, pieced them together in Photoshop and used the pieces that were already done like the Pengo lettering and Pengo himself to start my Illustrator file.
I got through everything but the sno bees on the right. Today I was having major issues trying to get a good image of the smaller sno-bees to trace. I had taken some photos close up of the sticker and I even was able to figure out my scanner with the laptop and scan the two snow bees. But no matter what I did, I couldn’t get as exact of detail as I wanted. So, I used what I had and traced sitting right next to the Pengo cabinet so I could memorize the shape and then trace it as best as I could with what I had.
Like I mentioned previously, this Pengo sideart isn’t color matched, it doesn’t have the halftone pattern, but it is a good start to work with if I ever want to have this reproduced.
~ Update May 22, 2008: Well, I ended up eating my words. A set of new, unapplied, NOS Sega Pengo sideart surfaced. I didn’t have to wait that long, and I was lucky enough to get it.
Ms. Pac-man Stencil Separations
I bought my Ms. Pac-man last October, and even when I bought it I knew that someday I wanted to either redo the sideart or get a cabinet that had more pink in the sideart.
I have thought about checking around for how much stencils would be, but hadn’t gotten around to it. I have monitored buying another Ms. Pac-man machine and switching cabs, but a deal hasn’t fallen in my lap yet, and Saturday I took the time to email a prominent collector who also does repro art and is well known for his quality stencils about making up a set.
He said he didn’t have the artwork for Ms. Pac-man separated. There is a vector set on localarcade.com, but it needs another set of processing to be ready to produce stencils.
Brian Jones (Prok) said he would work with me if I could get the separations done. I don’t know any printers that I feel like I could go to and have the stencils done for some sort of barter, so I have decided to start on it myself.
Brian has given me some basic instructions and I have an understanding of what he needs. He needs each color in different layers in Illustrator in the order that the color would be laid down on the cab. In the Ms. Pac-man case for stencils, it would be the base blue color, then the yellow, then the pink and finally the black.
Since I have not done this before, I am relying on my sense of 3d and general graphic experience to visualize how the paint would need to be laid out and in which order. I did a sample piece of the artwork, and Brian said I had the right idea so hopefully I can crank through and get it done.
We are still talking about how much it would it would cost to make them. I need to keep it cost effective just in case of a bad situation where I have to sell the game, I can’t get too much into it for that reason.
The History of Jr. Pac-man & it’s Sideart

Even with the past successes of Pac-man and Ms. Pac-man, most sites will tell you that the downturn of the arcade industry in the early 80’s prevented Jr. Pac-man from obtaining worldwide success. As such, the production of dedicated machines were halted and a number of conversion kits were made available instead. One kit was for a Pac-man conversion, and one was for a Super Pac-man conversion.
Below is the back of one of the flyer’s from the game. You can find this at Arcadeflyers.com.
You can see that it lists what you get in your conversion, a Jr. Pac-man Logic Board, Header Glass, Monitor Overlay Glass, Control Panel Artwork Overlay, and Front Cabinet Artwork Overlay (kickplate). No mention of full size sideart.
Since most Jr. Pac-man’s were conversions it is quite a challenge to find the original game that was produced in the unique Mappy cabinet. I have heard rumors that only 500 total were ever produced. (Heck, Mappy is a hard enough game to come by, and those go for decent prices as well.)
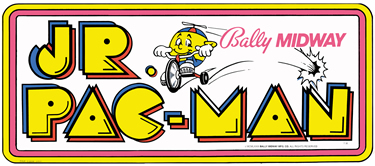
The conversion kits didn’t come with a set of the original sticker Jr. Pac-man sideart, only the “text” sticker. There were two different versions of this text sticker (both with rounded edges). One that said “Jr. Pac-man” with Jr. riding his bike which was meant for a Pac-man conversion, and one that just had the “Jr. Pac-man” text in a curve that was meant for Super-Pac-man conversions. The curved text Jr. Pac-man sticker would fit at the space at the top of the cabinet just above Super Pac-man’s head.

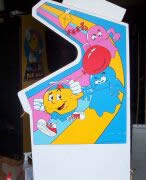
So with potentially only 500 dedicated style Jr. Pac-man’s ever sold, and counting the possible number of those destroyed or converted or whatever else, that makes the original sideart sticker on a Mappy cabinet pretty hard to come by. Hell, I wouldn’t have even known it existed if I hadn’t seen a photo of this Jr. Pac-man machine on the KLOV site (Image to the right). I would have thought that there was only the conversion artwork available.
Why I like the artwork for Jr. Pac-man
The Jr. Pac-man sideart has been a piece of artwork that I have known about for awhile, but in late 2006 through early 2007 I developed a true fascination for it. The reason I am facinated with the artwork is that I love the Pac-man character / history, I love the gameplay for this particular game and the tweaks they did to make it a new twist, and the fact that the Jr. Pac-man is really rare to find in it’s entirety with little damage (Most commonly in rips to the sideart) also makes it desirable.
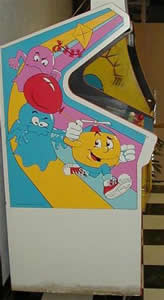
Check out the image below. What I really loved about the original sideart on any games is that it was a composition with the
shape of the cabinet, and some of the coolest artwork was stenciled on the cabinets. (Now, in this case, Jr. Pac-man is a little different because the original sideart is a sticker that was applied to a Mappy cabinet, sometimes right over top of the Mappy sideart sticker. When there are rips in the sideart, you can see the original Mappy sticker underneath.)

Early on I got a large format digital .jpg image of the Jr. Pac-man “text” sticker meant for a Pac-man conversion. Since it held little value to me I checked one of the larger websites for arcade art, Localarcade, and they didn’t have a source to trace this artwork yet. So I sent the guy this Jr. Pac-man text image and have been working with him to produce a nice piece of digital vector art.
Looking for an original Jr. Pac-man
As of late 2006 I know of two original Jr. Pac-man’s that are within a reasonable driving distance of me. One I have seen in person, and another one I have only seen in photos, but both have the sides painted over in black. This makes my drive that much stronger, being frustrated that there are two Jr. Pac-man’s in Mappy cabinets that are so close to me, but either have no sideart, or it is painted over and if potentially uncovered would have tears anyway.
I went back and forth on what to do. The painting on these two Jr. Pac-man machines was all over the game, even the top sides of the marquee header. I know what a pain paint can be to remove from a machine from experience. And even then, there are no guarantees on how it would look. So, I decided that I would start to look for images of the Jr. Pac-man sideart that I could trace and potentially have to reproduce if I ever figured I wanted either one of these two, or if I wanted to buy a Mappy and convert it.

I had spent a lot of time searching online for photos of the cabinet sides, but with little luck. Then in early 2007 I found a website that had photos of the game with sideart that were a little bit bigger in resolution than the photo on KLOV. Nonetheless, both of these sets of images were still too small to even think about reproducing the artwork in vector format by tracing. (On the left is one of the images I found.) With such little luck I just figured there was no way I was going to find enough instances of the Jr. Pac-man machines and collectors with them to get some photos to work from.
But then, I found a listing on GGDB of a collector who had a really nice looking Jr. Pac-man, and a photo of it in a line of other arcade machines showing that it had great sideart. Finally! Someone I could contact for help. (It wasn’t until later that I figured out later he was the same individual who had submitted the first photo I saw on Klov. I used the network of collectors I have been building to get an email address, because at the time I didn’t know his profiles on the Arcade forum websites, and started a line of communication to get the Jr. Pac-man artwork reproduced.
Jr. Pac-man Registry
I have started a registry for all of the dedicated Jr. Pac-man owners that still exist. There aren’t many, and its hard to confirm the real ones because of the shared Mappy cabinet. So, this list also considers whether the cabinet has the original dedicated sideart or not. Check out the Jr. Pac-man Arcade Game Registry.
Update on composite Mr. Do! Bezel vector art
Love this bezel, this Mr. Do! artwork is valuable to me. But as we’ve seen, one of these bezels is worth about a whopping total of $2. That’s not private sales, that’s eBay! The fact that these bezels are about worthless doesn’t change my motivation to vectorize the artwork.
Last night and earlier this morning I finished what cherries I could on the bezel that goes to this rare “white” Mr. Do! with sideart. There are five sets of cherries on the upper right, two on the middle right, and one in the top middle. Two of the sets in the upper right repeat, which is great because those cherries are on the bezel piece that bends, that I don’t physically have.
So, as of right now, I don’t have good enough photos to trace the middle cherries on the top right, and the cherries in the top middle. I bent one of the photos I had for the top Mr. Do! bezel portion to help me piece together some things, but I again have to wait until something else comes up.
The Mame guys have the Mr. Do! scans and photos I do, so I am hoping that maybe they can do something with the top that I don’t know how to do. Here is what it looks like.
Later in the day I got additional photos that were hi-res enough to trace the missing cherries on the upper right. They also showed a sixth set of cherries I hadn’t noticed before at the very top, so I traced those too and included them in the artwork. Now all I am missing are the cherries at the top!!
Vectorizing Rare Mr. Do! Bezel Pieces
Continued working on the rare “white” Mr. Do! bezel today. I got the main large yellow portions of the Mr. Do Bezel drawn with the blue diagonal lines included. I was also able to finish the base of the ice cream dish, and I also realized that there is a slight difference in the artwork for the apples, so I made another file for that. Pretty exciting to be further along.
I can piece most of the Mr. Do! bezel together today, and will probably finish up tomorrow by drawing the cherries with the new great photos I have. After almost a year of searching, I almost have a really accurate Mr. Do Bezel in a vector artwork format.


