How do I quickly change all of the names of my digital photos? How do I easily rename my digital photography?
Everyone can use this tip. Or least, it is good to know about, and then when you purchase Adobe Photoshop and stop screwing around with all that crappy free software, you will know how to use this.
Digital Cameras are about as cheap as a car payment these days, and everyone has got one. There is a whole new business cropping up for organizing, printing, and sharing these photos in online services and software. Never before have we had instant photos like this, and now that we have it, we want more, and want to know the best way to organize them.
The place to start is to change the crappy names that the camera gives them, something like DSC0000317 or whatever combo of letter and numbers your camera abitrarily decides to name your photos.
In steps Adobe Photoshop CS. Until now, I didn’t get the point of the Adobe File Browser, which is now a whole seperate program in Adobe CS2 called Bridge. In the File Browser in Photoshop, you can batch process rename all of your images to whatever you want. If you don’t know what a batch process is, it’s basically an automated little mini program you make to do a repetitive task for you, and making your life easier in the process.
Let’s get started.
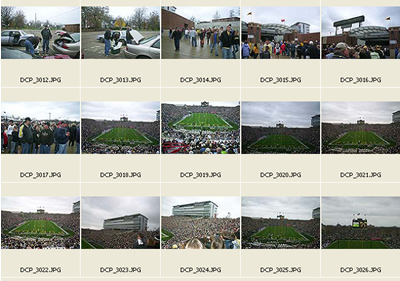
In the photo below, you will notice that I took a screenshot of the file browser in Photoshop, in one of the thumbnail modes for a series of photos I took with my cheap digital camera. As you can see, they are named terribly, and I would like to name them better to help me search for the more easily later on.

These are some photos I took at the IU vs. Purdue football game blowout last year. Let’s start to rename them now that you have seen a little snapshot of the file browser.
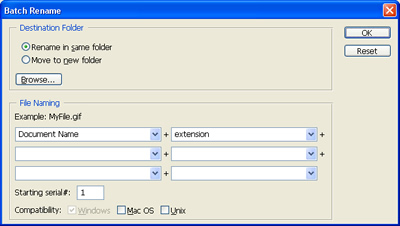
Step 1: Go up to your menus in the upper left, and choose Automate > Batch Rename
Step 2: You will see the below screen. The default option that you first see is to Rename in same folder. You also have the option to choose Move to new folder, with a browse button to find that destination. I am going to keep them in the same folder, and so should you for this example.

Step 3: Here is the scariest screen. This is very pragmatic if you have a technical kind of brain. Fortunately, Adobe steps you through this process fairly easily. As you change options here, you will see what your file will rename to.
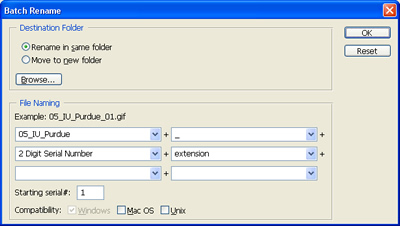
In this case, I want my files to be named 05_IU_Purdue and I want them to increment with a two digit serial number. You will see each box has a dropdown of scary options. But don’t worry, over time you will adjust to these.
I happen to like underscores for my files, for Unix server type reasons, so in the second box I add an underscore to seperate my serial number incrementation, and then I end my file in a lowercase extension. The extension used will be the same as the type of file you have currently.
Take a look at my screenshot now with all of my information filled in.

Step 4: After you have all of your own appropriate information filled in, hit “OK’ in the upper right and watch Photoshop work.
Now, I am aware that this option in some form was already available in Photoshop under File > Automate. But what I like about this, is that it cuts out one step. You will go to the folder you want to edit your images in, instead of selecting it from a file finder in the old way. This makes it much more visible and that is easier for me.
It would take me a lot longer to explain every option in the drop down menus, but most of them are pretty tell tale. Serial number is for just a regular number, and when you see one of the options in uppercase, that means that your output will also be in uppercase. Just watch your naming strategy at the top of the drop downs if you aren’t sure.
So now get busy, and take this power to rename all those old photos that are laying around, cluttering up your desktop.
Here are some similar arcade posts
- How do I save my action files? How do I bring / import my actions into a newer version of Photoshop?
- Automated Adobe Photoshop Functions & Actions Part 2
- Photoshop tutorial for punching text ‘effect’ out of an image
- How do I trace an image in 3ds Max? How do I create an Image plane?
- Save time exporting web images using Fireworks
If you enjoyed this post, please consider to leave a comment or subscribe to the feed and get future articles delivered to your feed reader.


Comments
No comments yet.
Leave a comment
Your email address is never displayed and cannot be spammed. If your comments are excessively self-promotional you will be banned from commenting. Read our comment privacy policy.